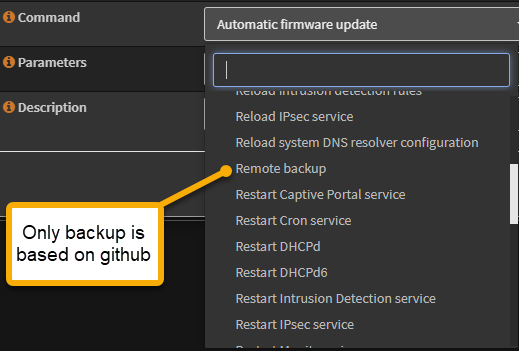
I recently setup an opnsense router to handle network traffic for my home lab. There’s a lot of configuration done at opnsense in terms of interfaces, IP reservations, unbound DNS, firewall settings, VPN, security certificates, and more. Aside from some manual backup options, how can all this configuration be preserved if the hardware fails? Well, opnsense has a cron-job facility that lets you schedule backups and other activity. This just doesn’t work for me – there’s an option there to create a Remote Backup job that will backup the opnsense settings to a github server and that’s it.
I’m not running a github server in my lab, and I’d rather not store this on the public github server even if my account is supposedly secure (anything can be compromised). The configuration is very sensitive, including security certificates, user accounts and passwords, firewall rules and more. I’d prefer to backup the configuration to my Synology NAS via SFTP. But the opnsense Command prompt offers no such selection. Github is it!
Stuck right? No! While it looks like I’m captive to what’s available in the gui, I figured out how to pull this off after a good bit of hunting and educating myself on some internals of opnsense and the FreeBSD OS it runs on top of. One avenue (that is in fact a dead-end) is to make a SSH connection with the opnsense router and setup a cron job using the command line crontab -e. This will appear successful at first, but if you modify ANY cron job settings in the opnsense gui, your cron job will be removed!
There’s actually a way to pretty easily extend the picklist of Commands you see in the opnsense GUI to include a custom job that does exactly what I want. This post describes the steps to do that.
Objectives
The steps I show below will first configure the Synology to accept SFTP connections for the purpose of sending it XML configuration backups from opnsense. We’ll setup a new user on the NAS called opnsense_backup. This user has limited privileges, allowing it only read/write access to a new folder where the backups will be stored. For security, the SFTP login that opnsense executes will authenticate thru SSH keys (password prompts would not work, there’s nobody to type it in). The backup is done by a script that you can install on opnsense and register as a new cron-job type that the opnsense gui recognizes. Finally, in the opnsense gui we’ll setup the cron job to execute the backup with the desired frequency.
Skills you need
To execute the steps in this post you need be just basically familiar with the DSM gui at the NAS, and also the opnsense gui for the router. You need to be able to make a SSH connection to the NAS with admin privileges, and also a SSH connection to the opnsense router with root access. You need just a basic understanding of using vi (no editing of files, just create new ones).
Create NAS backup destination and user account
In DSM at the NAS, go to Control Panel -> Shared Folder and create a new shared folder called opnsense_backup. This folder will collect the XML backup files from opnsense. As shown later, the files are all time-stamped with unique names that identify the date/time of the backup, and we’ll setup file-rotation so backups older than 30 days get deleted. Remember to add this new share to your HyperBackup/other backup software to further protect these files.
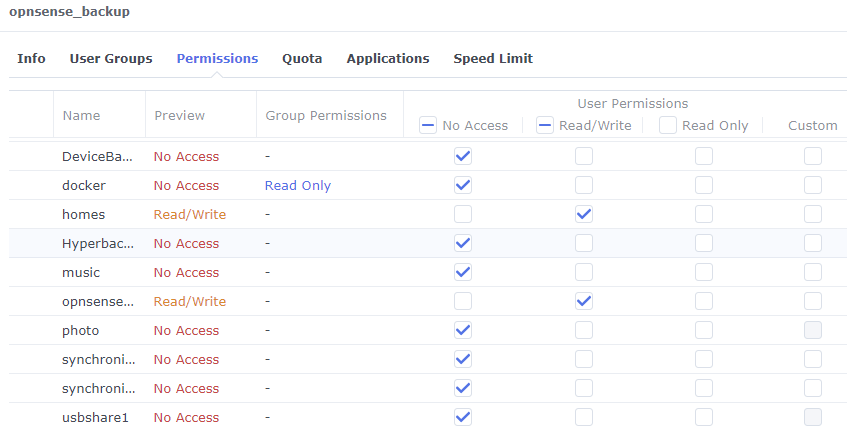
At Control Panel -> File Services -> FTP make sure the SFTP service is enabled. At Control Panel -> Users and Groups make sure user homes are enabled, then create a new opnsense_backup user account. Give the user a strong password. For privileges, give this account access to its own home folder, the opnsense_backup share created above, and the SFTP application itself. This will all “limit the damage” should this login ever be compromised.

At a SSH prompt on the NAS, execute the following commands to create a destination for SSH keys.
# Create location to store opnsense_backup user's keys
mkdir /var/services/homes/opnsense_backup/.ssh
touch /var/services/homes/opnsense_backup/.ssh/authorized_keys
Configure opnsense to make secure SFTP connections
At a SSH prompt on opnsense, generate a new SSH key using the keygen command.
# Generate a key
ssh-keygen
# accept default filename /root/.ssh/id_rsa at prompt, supply no passphrase
When keygen runs it will prompt you for a filename to store the key in. I accepted the default of /root/.ssh/id_rsa. Take note of the name and use it below if yours is different. You’ll also be prompted to enter a passphrase. Do NOT do that – just press enter. Passphrases are generally a good idea, but not in this case where the job is automated, with nobody to anwer a passphrase-prompt.
Now enter the following command to copy the generated key to the NAS. You’ll be prompted for a password – supply the password created on the NAS for the opnsense_backup user. Note my use of port 22 below – if your SFTP is configured with a different port then use that. Replace <your-NAS-hostname> with the hostname or IP address of your NAS.
# Copy key to NAS
scp -P 22 /root/.ssh/id_rsa.pub opnsense_backup@<your-NAS-hostname>:/home/
When that command completes, you should find the id_rsa.pub file in the opnsense_backup user’s home folder on the NAS.
Register SSH key at the NAS
We’ve stored the id_rsa.pub on the NAS above, now it needs to be properly registered as a SSH key for this user on the NAS.
In a SSH session on the NAS, login as admin and execute the following commands to append the new key to the authorized_keys file we created earlier. Also, it’s critically important to set the file permissions and ownership (chmod/chown below). SFTP will NOT accept the connection if you don’t do this!
# Save the key into authorized_keys file then remove and set permissions
cat /volume1/homes/opnsense_backup/id_rsa.pub >> /volume1/homes/opnsense_backup/.ssh/authorized_keys
rm /volume1/homes/opnsense_backup/id_rsa.pub
chmod 700 /volume1/homes/opnsense_backup/.ssh
chmod 600 /volume1/homes/opnsense_backup/.ssh/authorized_keys
chown -R opnsense_backup:users /volume1/homes/opnsense_backup/.ssh
Note that similar steps are shown in the Synology knowledge-base article for managing SSH keys where you just use File Station and no SSH work like I have above. The problem is the documented steps only work for SFTP logins by a admin user! Do what I show above for preparing .ssh and authorized_keys, and it will work for any user.
Test doing the backup
At a SSH prompt in opnsense, store the following script into a backup_opnsense.sh file. The location of the script is not important yet – just put it in your user home.
#!/bin/sh
DATE=$(date +%Y-%m-%d-%H%M)
BACKUP_FILE="/root/config-backup-$DATE.xml"
cp /conf/config.xml $BACKUP_FILE
scp $BACKUP_FILE opnsense_backup@stovallhut.online:/opnsense_backup/
rm $BACKUP_FILE
Remember to make the script executable:
chmod +x backup_opnsense.shExecute the script as a test.
./backup_opnsense.shOn this first run you’ll probably see a warning about the unknown ssh signature – press enter to ignore the warning and accept the SSH connection. This won’t show when you run the script again in the future.
You should NOT be prompted for a password. If you are, then something is not right with the above steps when it comes to properly registering the key on the NAS. Review and debug before moving forward.
If all went well, you’ll find a new XML backup in the opnsense_backup share on your NAS!
Add new cron job type recognized by the opnsense gui
We have a script that can backup the configuration now, but it does not run automatically on a schedule. Let’s fix that. We’ll use the above script as the basis for a new type of cron command we can schedule in the opnsense gui.
At a SSH connection as root on opnsense, execute the steps below. This will relocate the script in the FreeBSD file system to the /usr/local/etc folder so it’s part of the opnsense environment. File permissions are set as required. Then we’ll create an actions_sftp_backup.conf file to register our script as a cron job.
# Move script...
mv backup_opnsense.sh /usr/local/etc/backup_opnsense.sh
# Set file permissions
chmod 700 /usr/local/etc/backup_opnsense.sh
# Add as opnsense action
vi /usr/local/opnsense/service/conf/actions.d/actions_sftp_backup.conf
Paste the following content into the actions_sftp_backup.conf at the vi prompt.
[sftp_backup]
command:/usr/local/etc/backup_opnsense.sh
parameters:
type:script
message:Starting backup script
description:Backup config to NAS
Finally, restart the configd service so the new cron job will be recognized in the gui.
# Restart configd service to expose new config
service configd restart
Create cron job to periodically backup opnsense configuration
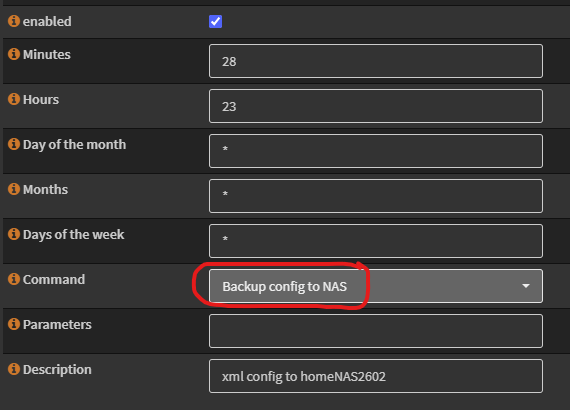
At this point we’re nearly done. In the opnsense web console, go to System -> Settings -> Cron and press the plus (+) button to add a new job.
Fill in the time to run the job. In my example I’m executing the script at 11:28 every night.

On the above Command picklist, you should see a new Backup config to NAS you can pick. Choose that and it will execute the SFTP backup script we prepared above.
To test the cron job, see in the gui how you can clone your job – this is an easy way to create a job that will run in about one minute so you can make sure this works. Let that happen, confirm you get a new backup in the opnsense_backup network share on the NAS. Then just delete your clone when you’ve seen it work.
Trim the backups so only the last 30 days are saved
With backups happening every day, the opnsense_backup share on the NAS will consume more and more space over time. See steps below that will fix that by running a script on the NAS each day that deletes backups that are older than 30 days.
On the NAS go to Control Panel -> Task Scheduler. Create a new task based on a user-defined script. Select to execute the job as root. On the schedule tab, set the frequency you want to run the task such as daily. On the task tab, paste the following content:
#!/bin/sh
# Path to the backup directory
BACKUP_DIR="/volume1/opnsense_backup"

# Delete files older than 30 days
find $BACKUP_DIR -name "*.xml" -mtime +30 -exec rm {} \;
We’re done! Like anything, test this for proper behavior. You should see backups getting saved every day into the new opnsense_backup share on the NAS. Make a point to come back later and make sure old ones are getting deleted as expected.
